
text to speech tutorials
Text to Speech for WordPress: Add a Listen Button (2026)
Text to speech for WordPress adds a play button to your posts so visitors can listen to an article instead of reading it. It helps readers who are commuting or multitasking, readers with low vision or dyslexia, and readers who find long posts hard to get through on a phone.
The quickest way to set it up is the WebsiteVoice text to speech WordPress plugin. You install the plugin, paste a short code snippet from your WebsiteVoice dashboard, and a listen button appears on your posts. There is no audio to record and nothing to generate per article: the audio is created the first time someone presses play.
This guide covers:
- What you need before you start, including the WordPress.com plan requirement
- The plugin install, step by step
- The script method for sites that can’t install plugins
- How to control what gets read and where the button sits
- Pricing, languages, and how WebsiteVoice compares with other WordPress TTS plugins
What a Text-to-Speech WordPress Plugin Does
A text-to-speech (TTS) plugin reads the text of a page aloud to your visitor. Most plugins add a small audio player at the top of each post. When a reader presses play, the plugin sends the article text to a speech engine and plays the result.
There are two kinds of engines, and the difference matters more than any feature list:
- Browser voices. Some free plugins use the Web Speech API built into the visitor’s browser. It costs nothing, but the voice changes from one browser and device to the next, and some browsers have very few languages.
- Server-generated AI voices. Plugins like WebsiteVoice create an audio file on their servers with AI voices. Every visitor hears the same voice, and the file can be downloaded or shared. This is what most people mean when they search for “WordPress AI text to speech.”
WebsiteVoice uses the second approach. Its Automatic Content Recognition finds the article body on the page, so you don’t have to mark up each post.

What You Need Before You Start
- A self-hosted WordPress site or a paid WordPress.com plan (WordPress.org software on hosts like Hostinger, Bluehost or SiteGround). The plugin requires WordPress 4.5 or higher and PHP 7.4 or higher, and it is tested up to WordPress 7.1.2.
- WordPress.com: paid plans only. The WebsiteVoice installation FAQ states: “If your site is hosted on WordPress.com, you need a paid WordPress.com plan to install plugins. The free plan does not allow plugins, so the widget cannot be added there.”
- One WebsiteVoice account per website. One account can only be associated with one website, so each site you run needs its own account.
- About 5 minutes and admin access to your WordPress dashboard.
How to Add Text to Speech to WordPress with the Plugin
These steps follow the official install flow on the WebsiteVoice WordPress plugin page: create an account, install the plugin, open its settings in WordPress, and paste your code.
Step 1: Create Your WebsiteVoice Account
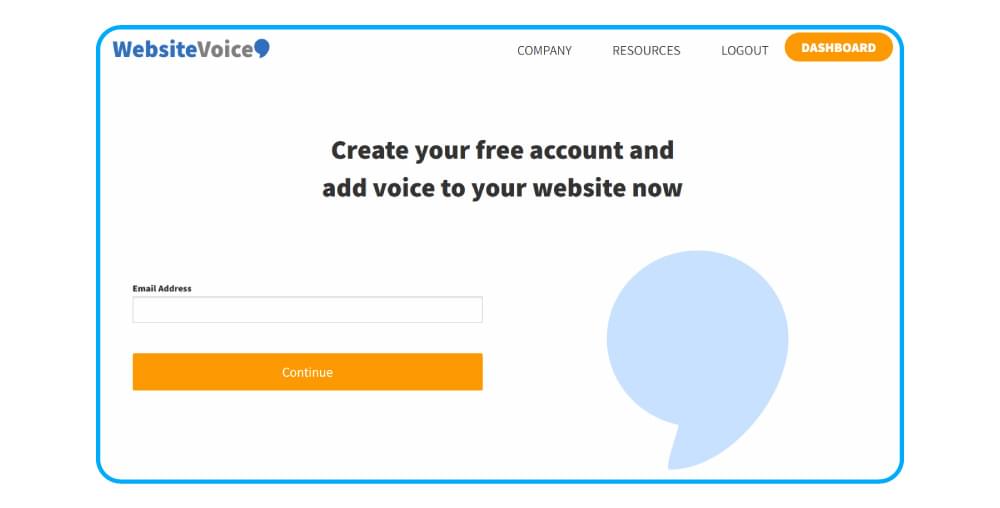
Go to WebsiteVoice and create an account with your website URL, email and a password. The 14-day free trial does not require a credit card.
Step 2: Customize Your Widget
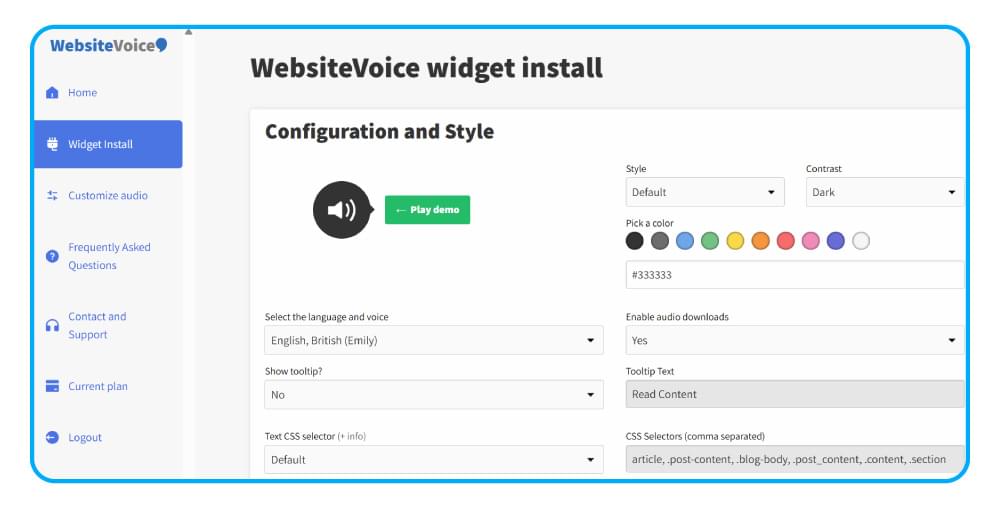
In the dashboard, open the widget install page. Choose the language and voice, then set the play button’s color, style and size so it matches your theme. You can change these settings later without touching WordPress again.
Step 3: Install the Plugin in WordPress
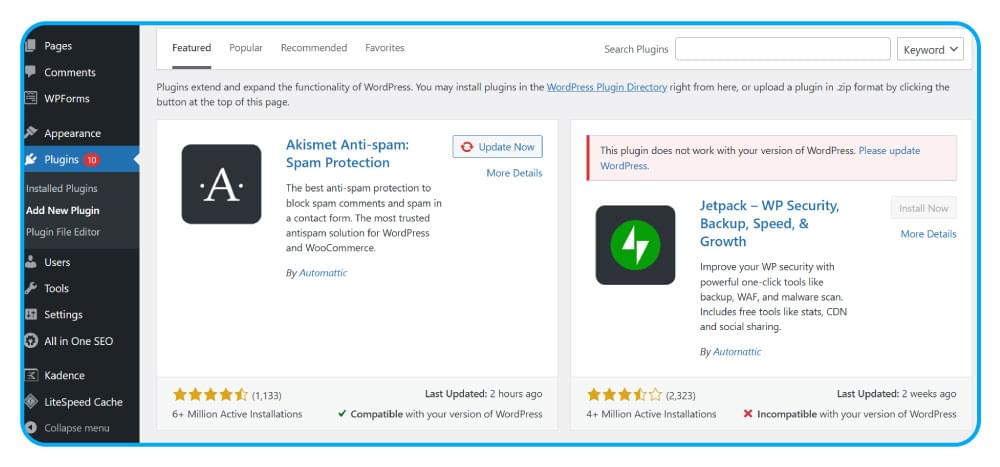
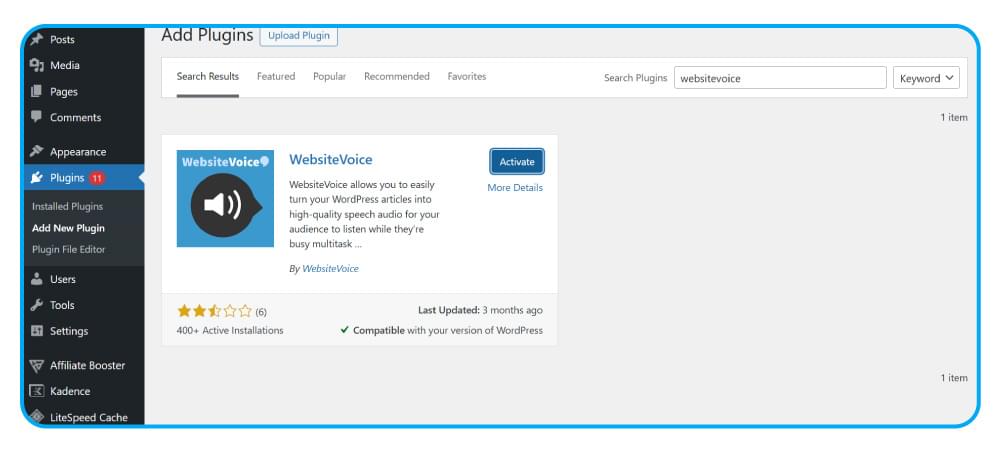
Log in to your WordPress admin, open Plugins and click Add New Plugin.
Search for “WebsiteVoice” and pick the official plugin. You can also download it from the WordPress.org plugin directory.
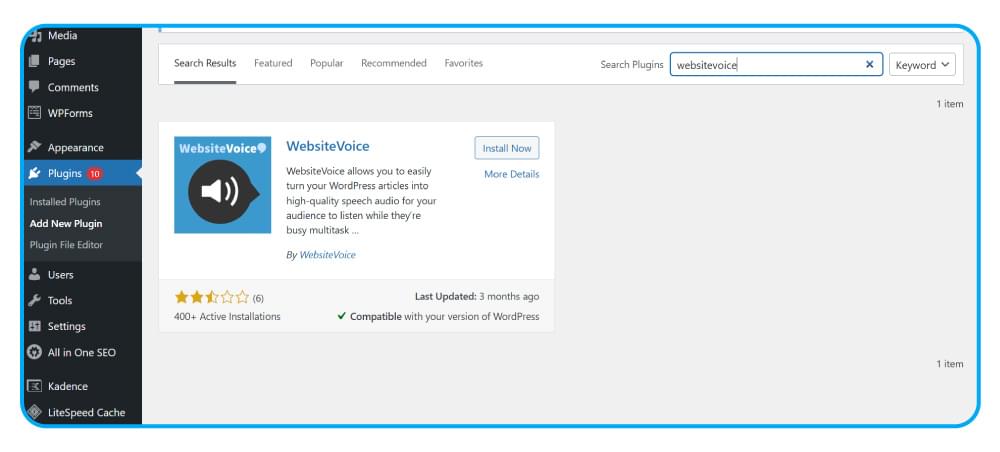
Click Install Now, wait a few seconds, then click Activate.
Step 4: Open the Plugin Settings
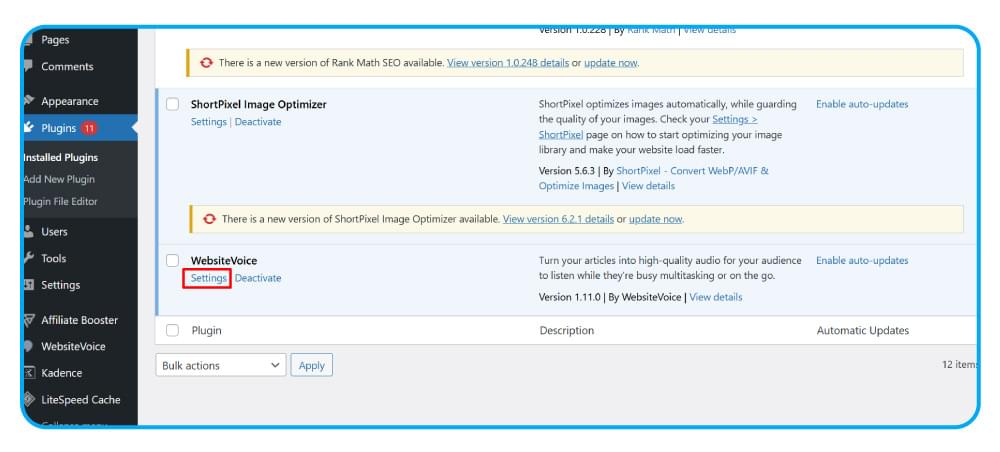
Open the WebsiteVoice settings page. You can reach it from the WebsiteVoice item under Settings in your WordPress dashboard, or from the Settings link next to the plugin in Installed Plugins.
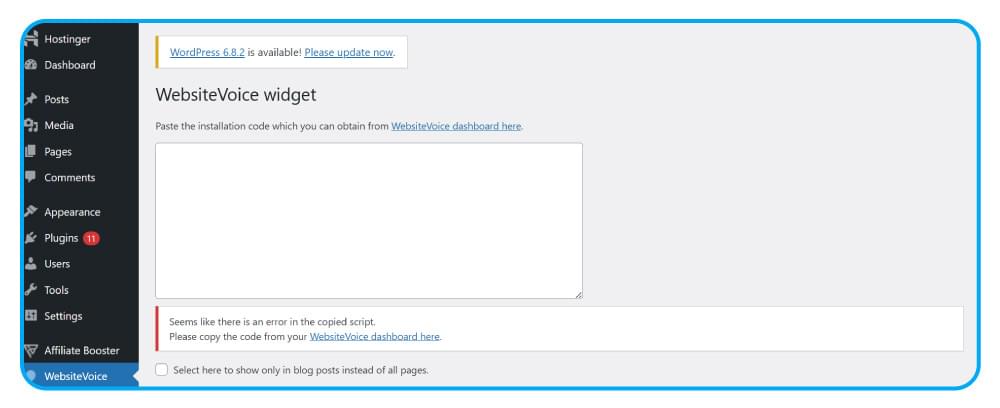
The settings page links to your WebsiteVoice dashboard. Click it to open the dashboard.
Step 5: Copy Your Code and Paste It into WordPress
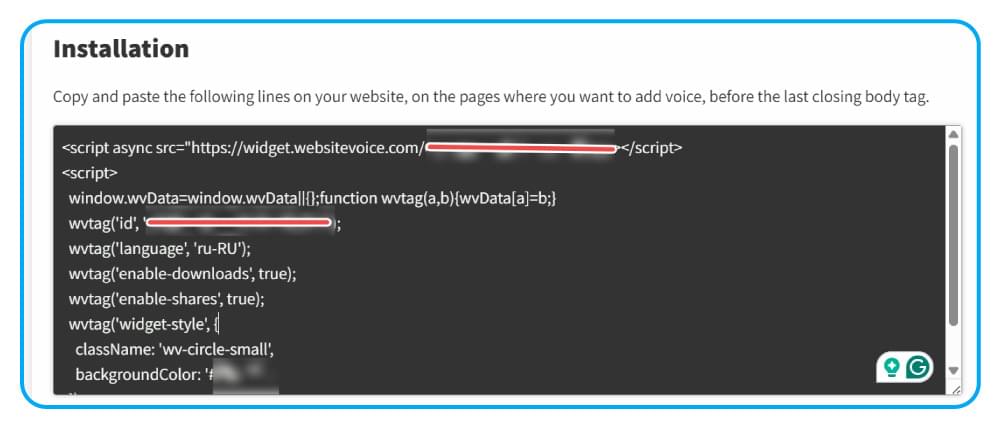
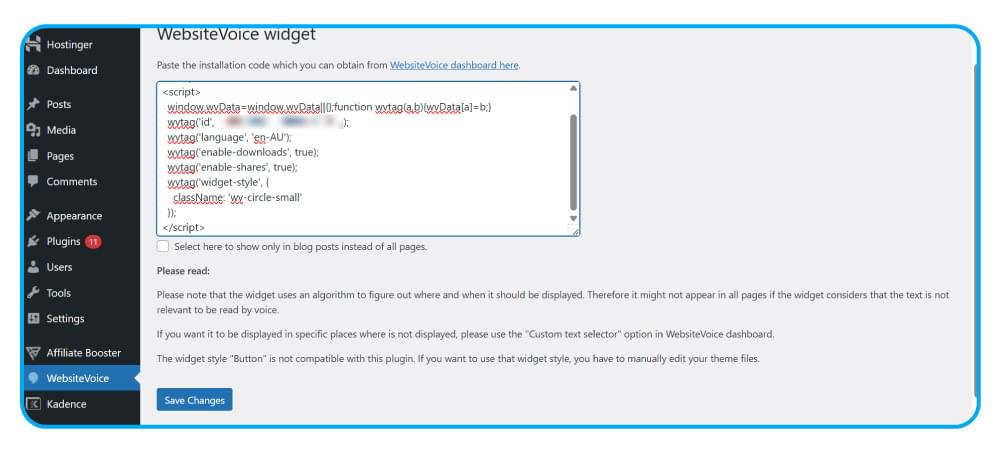
Copy the JavaScript code from your WebsiteVoice dashboard. The code contains your site ID, which tells WebsiteVoice which account and widget settings to use.
Go back to the plugin settings in WordPress and paste the code into the text field. If you only want the player on blog posts (and not on your home, about or contact pages), tick the checkbox for posts only. Click Save Changes.
Step 6: Authorize Your Website
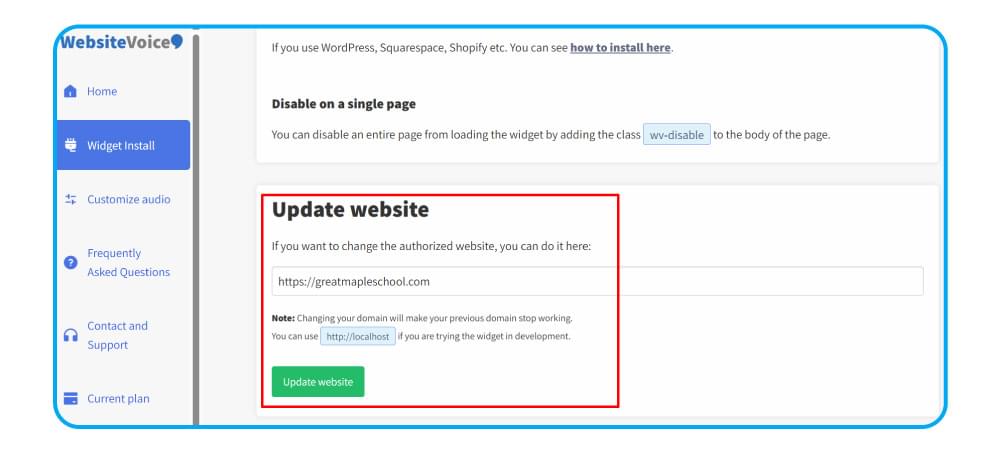
In the WebsiteVoice dashboard, check that your website address is listed in the widget install section, then click Update website. This tells WebsiteVoice which domain the player is allowed to run on.
Step 7: Test the Player
Open any post on your site. Before the install, your post looks like this:

After the install, the post has a play button:

Press play and listen for a few seconds. Then open your WebsiteVoice dashboard and check that the play shows up in your stats. If you use a caching plugin, clear the cache first so visitors get the updated page.
How to Add Text to Speech to WordPress Without a Plugin
Some sites can’t add plugins: a managed host blocks them, an agency locks the plugin list, or you simply want one less plugin. In that case, add the WebsiteVoice script to your theme instead. It is the same widget and the same dashboard.
- Create your account and customize the widget (Steps 1 and 2 above).
- Copy the snippet from your dashboard. It looks like this, with your own ID in place of
WV_SITE_ID:
1 | <script async src="https://widget.websitevoice.com/WV_SITE_ID"></script> |
- Paste it right before the closing
</body>tag on the pages where you want the player. In WordPress there are two common places:- Classic themes: add it to
footer.phpin a child theme, just above</body>. Editing the parent theme works too, but a theme update will overwrite it. - Block themes and child themes: print it from your child theme’s
functions.phpwith thewp_footerhook, which outputs code just before</body>on every page.
- Classic themes: add it to
- Authorize your website in the dashboard (Step 6 above) and test a post (Step 7).
The script loads asynchronously, after the page is usable, so it does not hold up your page load. The trade-off compared with the plugin: there is no “posts only” checkbox, so use the wv-disable class (below) on pages where you don’t want the player.

How to Control What Gets Read and Where the Button Appears
Automatic Content Recognition gets most WordPress themes right on the first try. When it doesn’t, these settings fix it:
| What you want | How to do it |
|---|---|
| Skip an element (byline, image caption, “related posts” box) | Add the wv-ignore class to it. WebsiteVoice skips that element and everything inside it. |
| Turn the player off on one page | Add the wv-disable class to the page’s <body> tag. |
| Turn the player off on many pages at once | Use Bulk Disable in the dashboard with a wildcard URL. |
| Read a specific container only | Set a custom text CSS selector in the widget settings, for example .entry-content. |
| Move the button somewhere else | Add <div class="wv-button-placeholder"></div> where you want it. The button’s styles can be overridden with CSS. |
If you added the code and no button appears, the widget most likely could not find your article text. Setting the custom text CSS selector to the element that holds your post content solves this in most cases.
WebsiteVoice Plugin Features
- 38 languages, with male and female voices. The list includes US, UK, Australian and Indian English, three Spanish variants, Portuguese and Brazilian Portuguese, Canadian French, Greek, Hindi, Indonesian, Japanese, Korean, Vietnamese and more.
- Speed control from 80% to 170%, keeping the pitch natural at each speed.
- Custom intro and outro text that plays before and after the article.
- MP3 download, so readers can save the audio and listen offline.
- Social share button to share the audio.
- Play, pause and stop controls in a player you can restyle to match your theme.
- Plays dashboard with daily play stats for your site.
Some of these depend on your plan. The pricing section below shows which.
Text to Speech in Danish, Norwegian and Other Languages
A large share of WordPress sites publish in languages other than English. WebsiteVoice supports Danish, Norwegian, Swedish, Finnish and Icelandic, along with German, Dutch, French, Italian, Polish, Czech, Slovak, Hungarian, Romanian, Russian, Ukrainian, Turkish, Arabic, Mandarin Chinese, Filipino and Welsh.
So if you searched for “tekst til tale WordPress” because you run a Danish or Norwegian blog, the setup is the same as above. Pick Danish or Norwegian as the widget language in Step 2 and the player reads your posts in that language. One Norwegian reviewer on WordPress.org noted that WebsiteVoice read Norwegian more naturally than the other plugins they had tested.
Also Read: Role of Multilingual Text-to-Speech in Content Localization Strategy
WebsiteVoice Pricing
Pricing is per website and based on new audio plays per day. One audio play covers about 1,000 words. Only the first conversion of an article each day counts. Every other play of that article the same day is free and unlimited. An 1,800-word article uses 2 plays the first time it is played that day.
| Plan | Price | New audio plays per day | What’s included |
|---|---|---|---|
| Starter | $9/month | 1 | 38 languages, widget customization, audio analytics, social sharing |
| Premium | $29/month or $309/year | 5 | Starter features, plus no audio or text ads, no WebsiteVoice watermark, additional voices, accessibility features, ticket support |
| Professional | $49/month or $529/year | 10 | Premium features, plus faster audio conversion, custom intro and outro text, MP3 downloads, voice speed control |
Every plan starts with a 14-day free trial, no credit card required. The trial runs on Starter and also unlocks additional voices, MP3 downloads and speed control so you can test them. WebsiteVoice notes that it may show ads in the widget or audio on the free trial or the cheapest plan. Check the live pricing before you buy, since plans can change.
Other WordPress Text-to-Speech Plugins Compared
WebsiteVoice is not the only option. Here is how the plugins people search for most often work, based on their WordPress.org listings in September 2026:
| Plugin | How audio is made | What to know |
|---|---|---|
| WebsiteVoice | AI voices generated on WebsiteVoice’s servers | Plugin or script. 38 languages. Pay per site; no permanent free plan. Not on the free WordPress.com plan. |
| GSpeech | Cloud voice engines managed by GSpeech | Free tier with a monthly character allowance, paid plans for more. Also works on other CMSs. |
| Trinity Audio | Cloud AI voices | Built for publishers. Free plan gives 5 credits a month on one domain. The plugin supports posts only; pages need its JavaScript integration. |
| BeyondWords | Cloud voices powered by ElevenLabs | Requires WordPress 6.6+ and PHP 8.0+. Aimed at larger publishers. |
| ResponsiveVoice | Runs in the visitor’s browser | 51 languages and 158 voices out of the box. Runs in demo mode until you add a key. |
| Text To Speech TTS Accessibility (AtlasVoice) | Free version uses the browser’s speechSynthesis engine | No account needed for the free version. Pro adds AI voices from AtlasVoice and third-party providers. |
| Play.ht | None | The plugin was closed on WordPress.org on March 2, 2024 for a security issue and can’t be downloaded. |
Which one to pick:
- If you want a consistent AI voice, a plays dashboard and a setup that works the same way with or without the plugin, WebsiteVoice fits small blogs and publishers well.
- If you only need a free read-aloud button and don’t mind the voice changing by browser, a browser-based plugin is enough.
- If you run a large newsroom and need voice cloning or audio ads, look at the publisher platforms.
For a wider comparison with pricing and languages for each tool, read our guide to the best text-to-speech widgets and plugins for websites.
Why Add Text to Speech to Your WordPress Site
- Accessibility. Audio helps readers with low vision, dyslexia or reading difficulties, and readers whose first language isn’t the one you write in. A TTS player improves access to your content; on its own it does not make a site WCAG or ADA compliant.
- Readers who can’t read right now. People listen while driving, cooking or working. A play button lets them finish an article they would otherwise close.
- Mobile reading. Long posts are harder to read on a small screen. Listening is easier.
- Engagement you can measure. The plays dashboard shows how many people actually listen, so you can see which posts get played.
Related: 9 Tips to Improve WordPress Website Readability
Conclusion
Adding text to speech to WordPress takes about 5 minutes: create a WebsiteVoice account, install the plugin, paste your code and authorize your site. If you can’t install plugins, the same script goes before </body> in your theme. From there, wv-ignore, wv-disable and the custom CSS selector let you control exactly what is read.
Start with the 14-day free trial. No credit card is required, and you can test it on your own posts before choosing a plan.
FAQs
Is There a Free Text to Speech Plugin for WordPress?
Yes. Some plugins are free because they use the voices built into the visitor’s browser, which means the voice and language support change from one device to the next. WebsiteVoice has no permanent free plan, but it offers a 14-day free trial with no credit card, after which plans start at $9 per month.
What Is the Best Text to Speech Plugin for WordPress?
It depends on your site. For a small blog or publisher that wants a consistent AI voice, stats and MP3 downloads, a hosted player like WebsiteVoice is a good fit. For a free button with basic voices, a browser-based plugin works. Large newsrooms often choose publisher platforms with voice cloning and ad features. See the comparison table above.
Does WebsiteVoice Work on WordPress.com?
Yes, on a paid WordPress.com plan. WebsiteVoice’s installation FAQ says you need a paid WordPress.com plan to install plugins; the free plan does not allow plugins, so the widget cannot be added there. It also works on any self-hosted WordPress site.
Can I Add Text to Speech to WordPress Without a Plugin?
Yes. Copy the WebsiteVoice script from your dashboard and paste it before the closing </body> tag in your theme, for example in a child theme’s footer.php or through the wp_footer hook in functions.php.
Does WordPress Have Built-In Text to Speech?
No. WordPress core does not include a text-to-speech player. You need a plugin or a script like WebsiteVoice to add one.
Can I Use AI Voices in WordPress?
Yes. WebsiteVoice generates audio with AI voices on its servers, so every visitor hears the same natural-sounding voice regardless of their browser. Premium and Professional plans add more voices.
Will a Text-to-Speech Plugin Slow Down My WordPress Site?
The WebsiteVoice widget is small and loads asynchronously after your page is usable, so it does not affect how fast your content appears.
Can I Show the Player Only on Blog Posts?
Yes. The plugin settings have a checkbox to show the player only on posts. To remove it from a single page, add the wv-disable class to that page’s body tag.
Can Visitors Download the Audio as an MP3?
Yes, on the Professional plan, and during the free trial. Readers can save the MP3 and listen offline.
How Many Languages Does WebsiteVoice Support?
38 languages, including several English, Spanish, Portuguese and French variants, as well as Danish, Norwegian, Swedish, Greek, Hindi, Indonesian, Japanese and Korean.
Is Text to Speech the Same as Speech to Text?
No. Text to speech reads your written content aloud to visitors. Speech to text turns spoken audio into written text, for example for dictation or transcripts. WebsiteVoice is a text-to-speech tool.
Related Reading
Best Text-to-Speech Widgets and Plugins for Websites
Trinity Audio vs WebsiteVoice: Which Text-to-Speech Player Fits Your Website?



Improve accessibility and drive user engagement with WebsiteVoice text-to-speech tool