text to speech tutorials
How to Add a Text-to-Speech Play Button to HubSpot CMS
HubSpot CMS runs a lot of B2B websites and company blogs, and HubSpot lets you add custom code to every page from its settings. That means you can give visitors a way to listen to your pages and blog posts with a single script, without editing a theme or a template.
WebsiteVoice is a text-to-speech widget that turns the written content on your website into audio. Once the WebsiteVoice script is on your HubSpot site, a play button appears on your pages and visitors can listen instead of read.
In this guide, we’ll show you how to add the WebsiteVoice text-to-speech play button to HubSpot CMS.
Step-by-Step Guide to Add a Text-to-Speech Play Button to HubSpot
HubSpot has two places for custom code: site-wide settings, and the settings of each individual page. For blog posts, HubSpot doesn’t offer a per-post footer HTML field, so the site-wide Site Footer HTML setting is the right place for the WebsiteVoice script. It covers your website pages and your blog in one go.
Follow these steps:
1. Open WebsiteVoice’s dashboard in a new tab. If you don’t have an account yet, you can start with a 14-day free trial. No credit card is required.
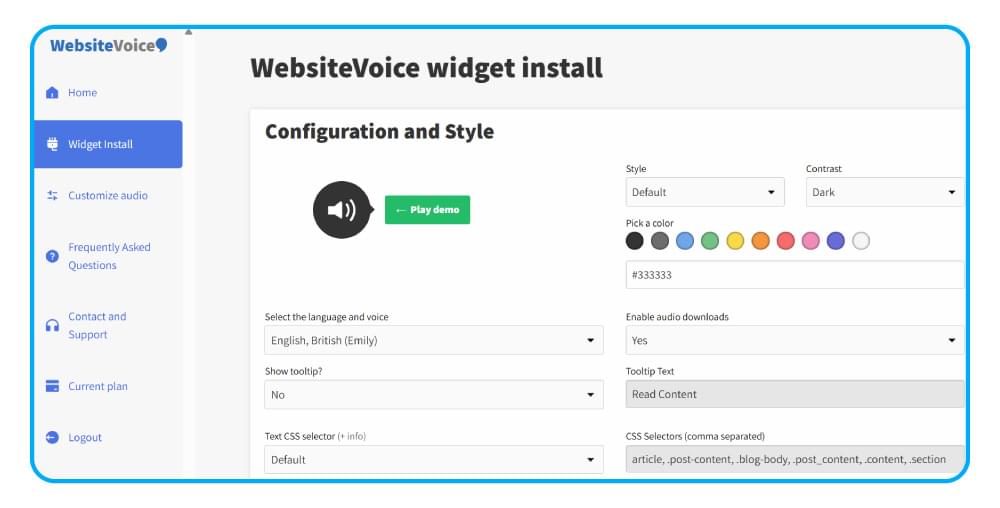
2. In the widget settings, set up the play button the way you want it:
- Choose the language and voice. WebsiteVoice supports 38 languages.
- Customize the style and color of the play button so it matches your HubSpot theme.
- Add custom intro or outro messages if you want a short line before or after each article.
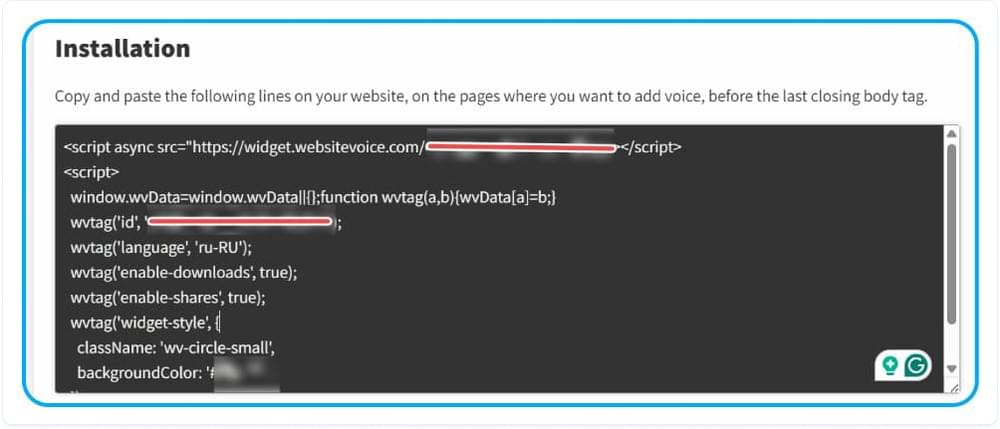
3. Scroll down and copy the WebsiteVoice JavaScript code.
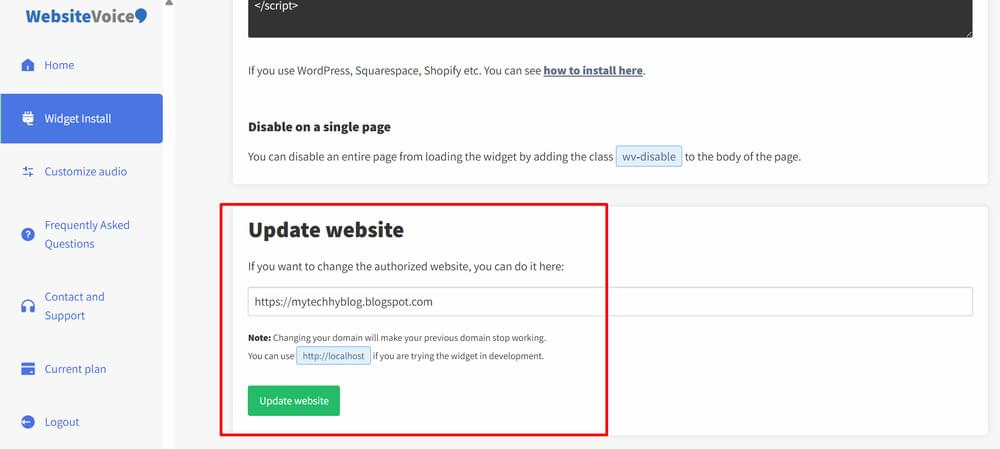
4. Add your HubSpot website URL in the Update website section so the WebsiteVoice widget is authorized to run on your domain. If your blog lives on a separate subdomain (for example blog.yourdomain.com), make sure that is the URL you authorize.
5. Now log in to your HubSpot account and click the settings icon in the top navigation bar.
6. In the left sidebar, go to Content > Pages.
7. Use the Choose a domain to edit its settings dropdown. Select the domain your website or blog runs on, or select Default settings for all domains to add the play button to every connected domain.
8. Find the Site Footer HTML section. If you selected a specific domain, click Override default settings first.
9. Paste the WebsiteVoice code into the Site Footer HTML field and click Save in the bottom left.
10. Open one of your published pages or blog posts. The WebsiteVoice play button now appears, and visitors can click it to listen to the content.
If you only want the play button on one specific landing page or website page, you can use that page’s own settings instead: open the page in the content editor, click Settings, select Advanced, paste the code into the Footer HTML field under Additional code snippets, then click Publish or Update.
Want a listen button on your HubSpot blog? Start your free WebsiteVoice trial and paste one line of code.
Before adding the widget, your HubSpot pages can only be read. After you add it, the play button appears on the page and visitors can listen to your articles, landing pages and resources on any device.
Keep Navigation and Forms Out of the Audio
HubSpot pages often include menus, CTAs, forms and footers that don’t need to be read aloud. WebsiteVoice skips any element with the wv-ignore class, so you can add that class to modules you want to leave out of the audio. If you don’t want the play button on a page at all, add the wv-disable class to that page’s <body> tag.
Why Add Text-to-Speech to Your HubSpot Website?
- Accessibility: Visitors with low vision, dyslexia or reading difficulties can listen to your content instead of struggling through it.
- More engagement: Long blog posts and resource pages are easier to finish when people can listen while they do something else.
- Multilingual reach: With 38 languages available, you can match the voice to the language of your pages.
- No developer needed: The whole setup is one script in a HubSpot setting you already have access to. There is no theme or template to edit.
- Audio analytics: Every WebsiteVoice plan includes audio analytics, so you can see which of your HubSpot pages and posts people listen to.
Conclusion
Adding a text-to-speech play button to HubSpot CMS takes a few minutes. Copy the WebsiteVoice script, paste it into Site Footer HTML, and every page and blog post on that domain gets a listen button. Your content becomes easier to access and easier to finish, without touching your theme.
If you have any trouble adding WebsiteVoice to HubSpot, get in touch with our customer support.
FAQs About Adding Text-to-Speech to HubSpot
Which HubSpot Plans Let Me Add Custom Code?
HubSpot’s help documentation lists code snippets as available on all products and plans, and notes that the head and footer HTML options vary by subscription and content type. To check your account, click the settings icon, go to Content > Pages, and look for the Site Footer HTML section.
Will the Play Button Show on My HubSpot Blog Posts?
Yes, if you add the script to Site Footer HTML for the domain your blog runs on. HubSpot doesn’t provide a per-post footer HTML field for blog posts, so the site-wide setting is the way to cover your blog.
Can I Add the Play Button to Only One Page?
Yes. Open the page in the content editor, go to Settings > Advanced, and paste the code into Footer HTML under Additional code snippets. This works for website pages and landing pages.
Can I Stop Parts of the Page from Being Read Aloud?
Yes. Add the wv-ignore class to any module or element you want WebsiteVoice to skip, such as navigation, forms or CTAs.
Does WebsiteVoice Replace HubSpot’s Own Accessibility Settings?
No. WebsiteVoice adds an audio version of your content. You should still use descriptive alt text, clear headings and good color contrast in your HubSpot pages. The play button works alongside those basics.
Related: Getting Started with WebsiteVoice: Add TTS to Your Website



Improve accessibility and drive user engagement with WebsiteVoice text-to-speech tool